
Introduction
The use of shoulder arthroplasty has continued to rise over the past two decades, driven by expanding indications and improvements in implant design (Best et al. 2021a). With broader adoption and improved survivorship of implants, surgeons are facing increasing complexity in both primary and revision procedures (Chelli et al. 2022; Piper and Neviaser 2022; Best et al. 2023; 2021b). Many of these cases present with significant glenoid deformity or bone loss, posing challenges that often exceed the design limitations of standard implants. Severe glenoid bone loss remains one of the most difficult problems in shoulder arthroplasty (Porcellini et al. 2021a; Seidl et al. 2016). Conventional solutions such as augmented baseplates, eccentric reaming, and bone grafting can be effective in moderate cases of deformity but are often inadequate when faced with substantial or irregular deformity (Mehta and Nicholson 2023; Holt and Throckmorton 2019). In such cases, off-the-shelf implants may be unable to achieve stable fixation, restore the native joint line, or properly match the patient’s altered anatomy (Burton et al. 2023). In cases with asymmetric wear, medialization, or insufficient bone stock, conventional solutions are often not viable (Burton et al. 2023). Custom glenoid implants, manufactured using patient imaging and advanced 3D modeling techniques, have emerged as a solution to this problem. Custom implants enable individualized reconstruction of glenoid bone defects that account for patient-specific joint positioning, optimized fixation, and maximal contact with remaining native bone (Eraly et al. 2016).
The aim of this paper is to outline the custom process for a patient with severe bone loss starting with identifying a patient, engineering considerations when designing the custom glenoid baseplate, and execution of the surgical technique. Through this case presentation, we walk surgeons through the process of 3D-printed implant creation, demonstrating the rationale behind the design and manufacturing process and highlighting the role of customization in addressing complex deformities.
Case Presentation to Demonstrate Step-by-Step Process of Patient Identification and Implant Creation
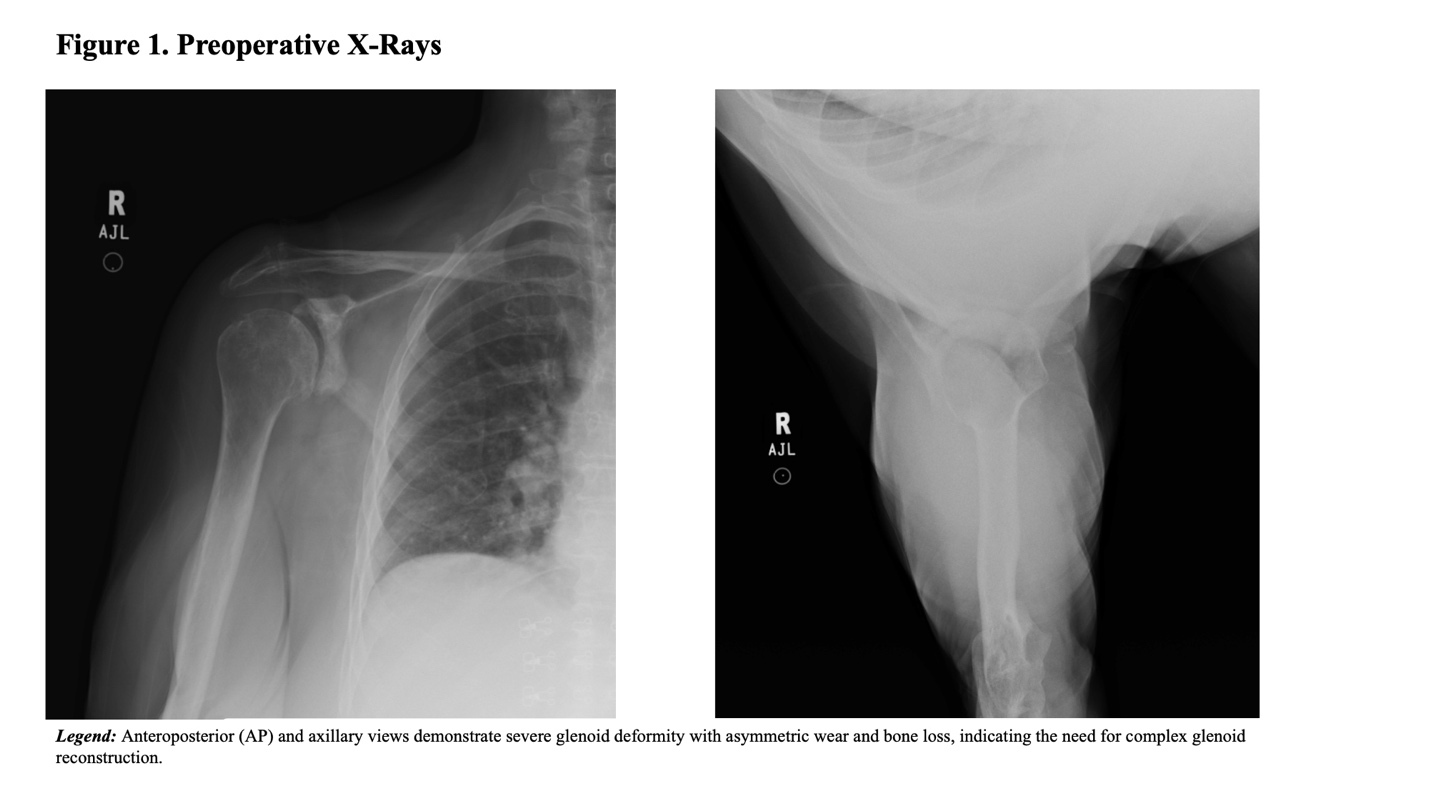
We present the case of an 80-year-old female with a history of severe bilateral glenohumeral osteoarthritis who previously underwent a left reverse shoulder arthroplasty. Two years postoperatively, she sustained a left periprosthetic humerus fracture treated with open reduction and internal fixation. Given the revision surgery was extensive, her function in the left arm remained limited. She later presented with progressive pain and disability in the right shoulder. Conservative treatments including NSAIDs, corticosteroid injections, and activity modification failed to provide relief. The patient was apprehensive of undergoing a contralateral shoulder replacement given her limitations but had significant loss of function and pain. Imaging revealed a chronic glenoid fracture with significant deformity and glenoid bone loss (Figure 1).
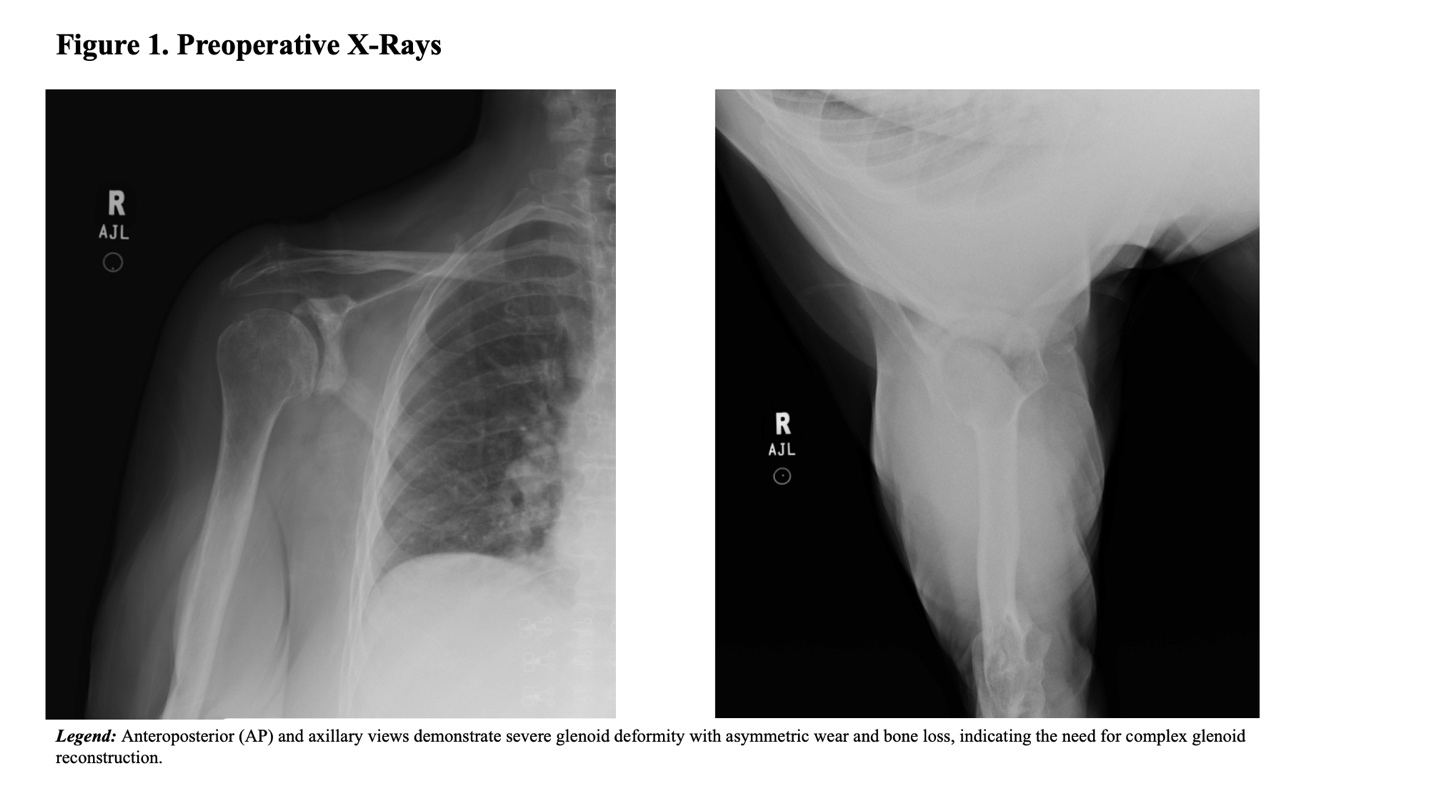
Glenoid bone loss poses a known challenge in reverse shoulder arthroplasty. Biomechanical studies have shown that glenoid bone loss approaching 50% significantly compromises initial fixation of standard baseplates due to increased micromotion and instability (Martin et al. 2021; 2017). A recent systematic review by Puckett et al. found that standard fixation becomes unreliable below 67% baseplate coverage, with initial mechanical stability observed only at 75% or greater (Puckett et al. 2025). Wagner et al. similarly recommends alternatives such as bone grafting when 80% coverage cannot be achieved (Wagner et al. 2015).
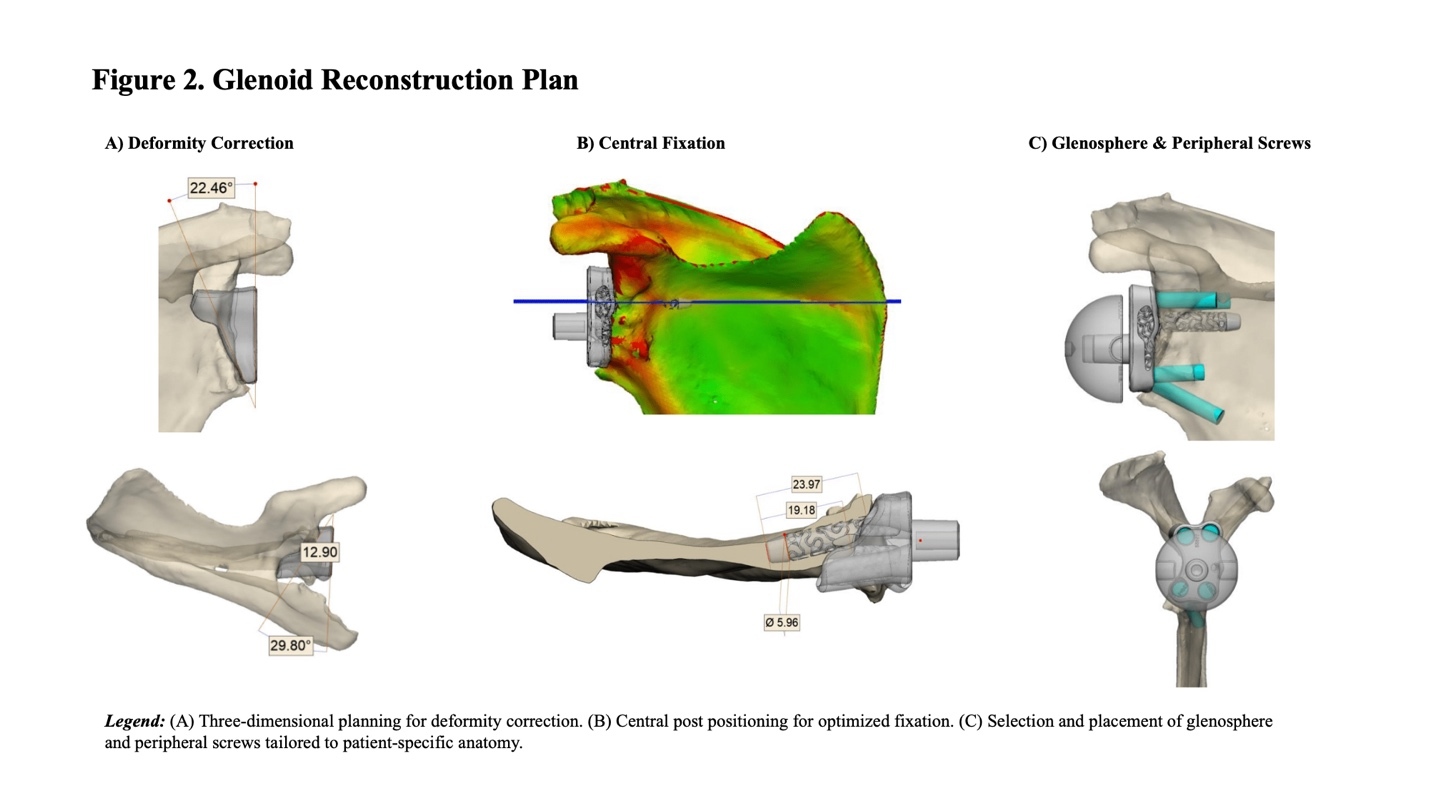
Current strategies for addressing glenoid bone insufficiency include off-the-shelf implants, augmented baseplates, and bone grafting (Porcellini et al. 2021b). Off-the-shelf implants rely on a central screw or post and peripheral screws with limited angular flexibility, while augmented baseplates can offer surgeons up to 20-25 degrees of correction (Wesorick et al. 2025). These options were evaluated during preoperative planning with measured 29.8° of retroversion combined with 22.5° of inclination the patient’s narrowed and retroverted glenoid morphology and medial erosion would have led to anterior and posterior overhang, inadequate backside seating, and insufficient screw purchase and perforation of vault with glenoid baseplate. Standard implant types were planned to obtain adequate fixation with no success. Given the severity and pattern of bone loss, standard or augmented components could not achieve meaningful implant-to-bone contact or secure fixation. Additionally, selective reaming, bone grafting, and screw stilting were also not feasible due to the geometry of the defect.
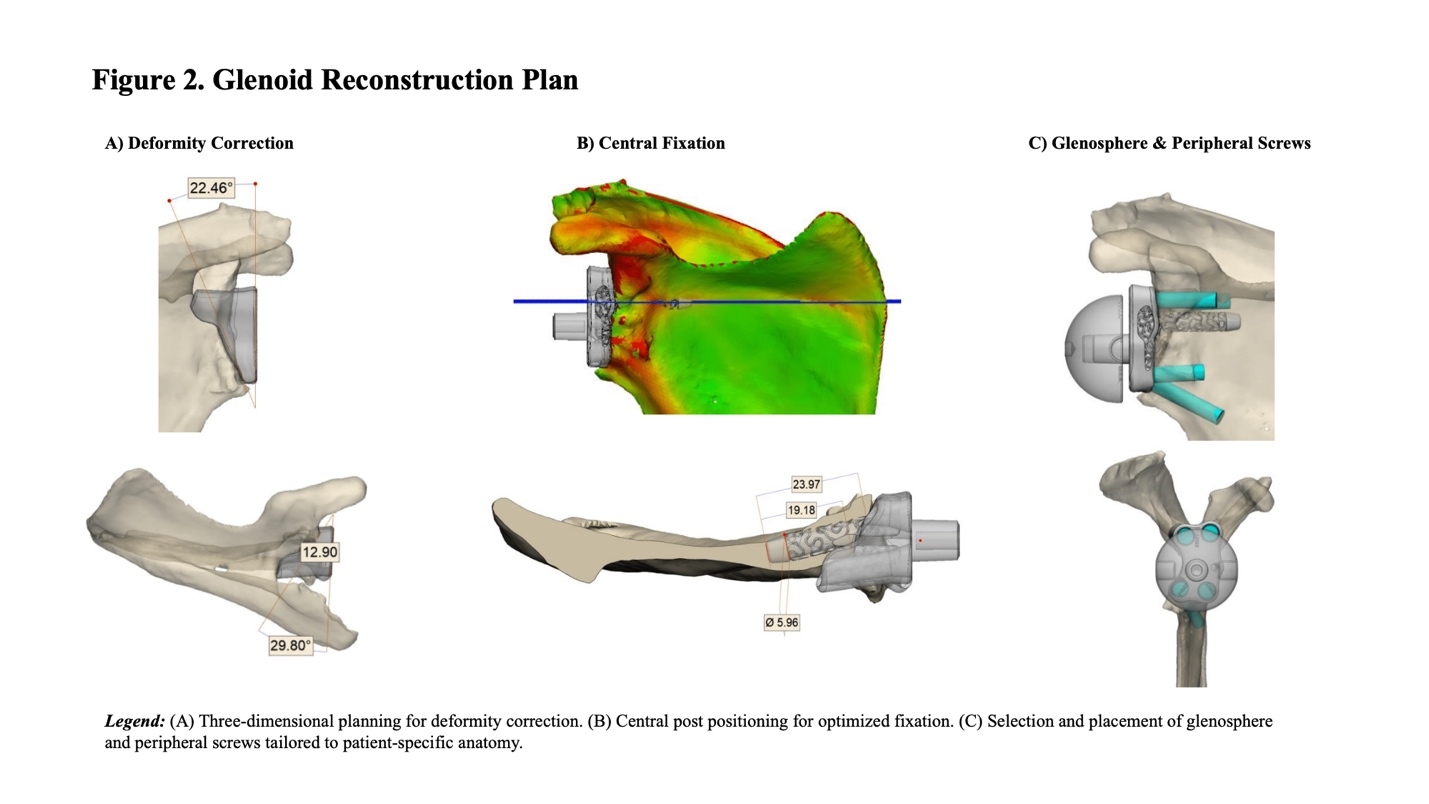
After discussing treatment options with the patient, the decision was made to proceed with a custom glenoid implant. A custom implant was ordered and selected to ensure optimal implant fixation , maximal baseplate contact area and central post and peripheral screw fixation (Figure 2). Customization allowed adjustment of the central post to optimize fixation and length to anchor the baseplate securely in the available bone stock and screw fixation, ensuring a stable and functional reconstruction tailored to her unique anatomy.
Digital Design Process
CT Scan Requirements & Segmentation
To design a custom reverse shoulder baseplate, precise imaging is paramount. The process begins with obtaining a high-resolution CT scan, stored as Digital Imaging and Communications in Medicine (DICOM) files. Slice spacing should be no greater than 1.25 mm and pixel resolution below 0.5 mm, ensuring comprehensive anatomical visualization. These specifications are essential for capturing the intricate bony anatomy of the glenoid data, forming the foundation to accurately reconstruct the patient’s anatomy when creating a model of the shoulder structure. Typically, scans older than 6 months are not used due to changes to relevant anatomy and optimally the previous hardware removed.
After CT acquisition, segmentation isolates specific bony structures of the shoulder using specialized software like Materialise Mimics (Leveun, Belgium). The soft tissues are removed from the dataset to generate a focused 3D bony representation of the shoulder but for patients with prior implants or hardware, segmentation is more complex due to the presence of metal artifacts. In these cases, CT machines equipped with Metal Artifact Reduction (MAR) technology are often employed to minimize distortion. When needed, staged segmentation techniques digitally erase previous implants, allowing for more accurate modeling and the rise of auto-segmentation tools has significantly accelerated this process (Zhao et al. 2023). Once segmentation is complete, a highly detailed 3D surface model which reflects the contours and nuances of the patient’s specific anatomy is created to serves as the foundation for a custom implant or surgical guide design, ensuring that the final product precisely aligns with the patient’s unique bony morphology.
Design Process
The design process involves three primary considerations: anatomical correction through the baseplate, maximizing central & peripheral fixation, and optimizing glenosphere positioning. The correction through the custom augment portion of the baseplate is determined by understanding the inclination and version of the premorbid glenoid. These corrections are calculated in 3D space using methods adapted from traditional 2D CT measurements (Shukla et al. 2019). This patient’s glenoid was measured at 29 degrees of retroversion and 22 degrees of superior tilt. The backside of the custom baseplate is contoured to precisely align with the curvature of the morbid glenoid face. Combined with significant medialization and narrowing of the glenoid, these values informed the final implant geometry, which re-established the joint line at the level of the inferior glenoid tubercle and restored to 0 degrees of version and 0 degrees of tilt while also maximizing bony contact (Figure 2A).
Once anatomical correction is established, the focus is on maximizing fixation, particularly in cases with significant bone loss. The engineers can evaluate bone density and architecture of the scapula to find the best bone for the central post. In this case, the central post needed to be offset superiorly and anteverted to engage the best available bone, with a depth exceeding 20 mm to ensure robust fixation (Figure 2B). Porosity is incorporated throughout bone-contacting portions of the baseplate to optimize osseointegration. The porosity level is carefully calibrated to mimic natural bone structure, providing an ideal environment for new bone tissue to grow into the implant’s surface (Kelly et al. 2021).
Lastly, peripheral screw holes are strategically designed in the baseplate to maximize fixation and minimize the risk of baseplate loosening. The baseplate typically includes at least three locking screw holes, with orientation tailored to maximize length of screws, optimize placement in best bone quality and available bone stock. In cases of low bone density or complex anatomy, engineers may opt for divergent screw angles to enhance stability and ensure the screws are anchored into the most robust regions of bone. Importantly, because custom implants typically do not include reaming, over-lateralization can be a concern. In the case we present, four screws were placed to fixate the baseplate into the remaining bone (Figure 2C).
Once the initial design plan is complete, the surgeon reviews and approves the proposed design. In particular, the surgeon’s role is important in refining the design characteristics to account for soft tissue balance, implant fixation, implant orientation preferences, and ensuring that screw trajectories are accessible based on approach and soft tissue constraints. Once the design is finalized and surgeon-approved, the design model is sent for 3d-printing. This file defines the implant’s geometry and is translated into G-code instructions through slicing software, which guides the 3D printer’s operations layer-by-layer to manufacture the custom implant exactly as designed.
Material Selection and 3D Printing
The custom baseplate is fabricated from titanium alloy, Ti6Al4V, using an additive manufacturing technique called powder bed fusion (PBF). Ti6Al4V is selected due to its advantageous mechanical strength, biocompatibility, and corrosion resistance, and PBF enables precise geometry and surface features, including porous regions or intricate patient-specific curvatures. Additionally, the Young’s modulus of the porous 3d-printed structure is comparable to cortical bone, which reduces stress shielding and enhancing implant stability. The porosity promotes osseointegration, which is critical for long-term fixation within the bone. Titanium alloys also form a stable oxide layer that enhances corrosion resistance, making them ideal for implants that require strong, long-lasting osseointegration (Zhao et al. 2022).
For the glenosphere, cobalt-chromium alloys (e.g., CoCrMo) are selected for their exceptional wear resistance and low friction, both of which are essential for articulating surfaces. CoCrMo’s high-strength, wear-resistant properties make it the gold standard for load-bearing, articulating components in joint replacement, to reduces joint wear and minimizes the risk of implant degradation (Ramezani and Ripin 2023). Because the glenosphere does not have patient-specific features or bone contact regions, it is often machined from stock rather than 3d-printed.
Post-Processing
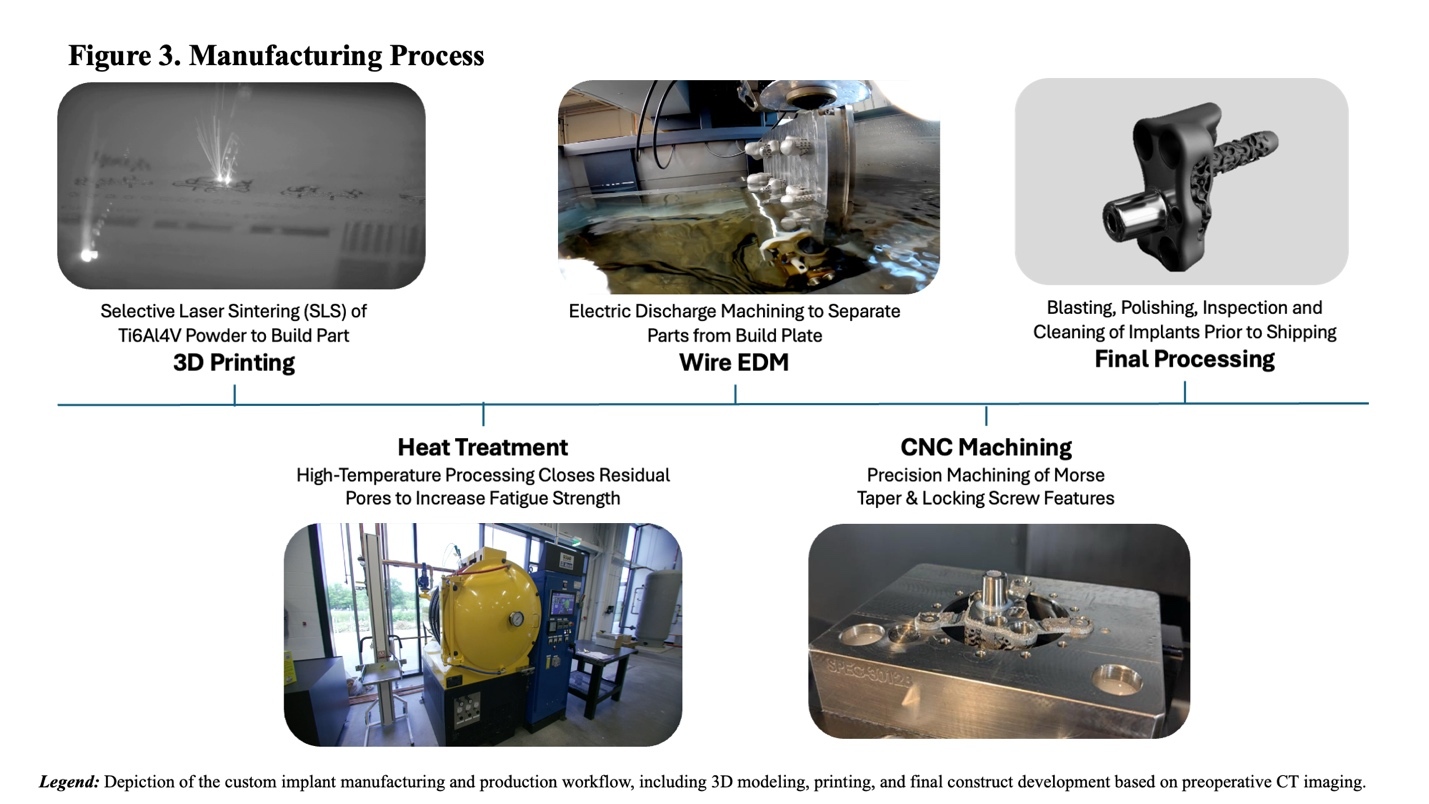
After 3D-printing is complete, multiple post-processing steps are essential to optimize surface finish, remove support structures, and perform final shaping (Figure 3). Post-processing begins with heat treatment, which helps to ensure the durability and functionality of the titanium baseplate. Hot isostatic pressing (HIP) is commonly used to relieve internal stresses generated during the printing process. By applying high temperature and pressure, HIP ensures a homogenous microstructure and closes internal voids. This step significantly improves fatigue resistance and ductility in titanium implants, both essential qualities for high-stress, load-bearing components like shoulder baseplates (Health C for D and R 2020).
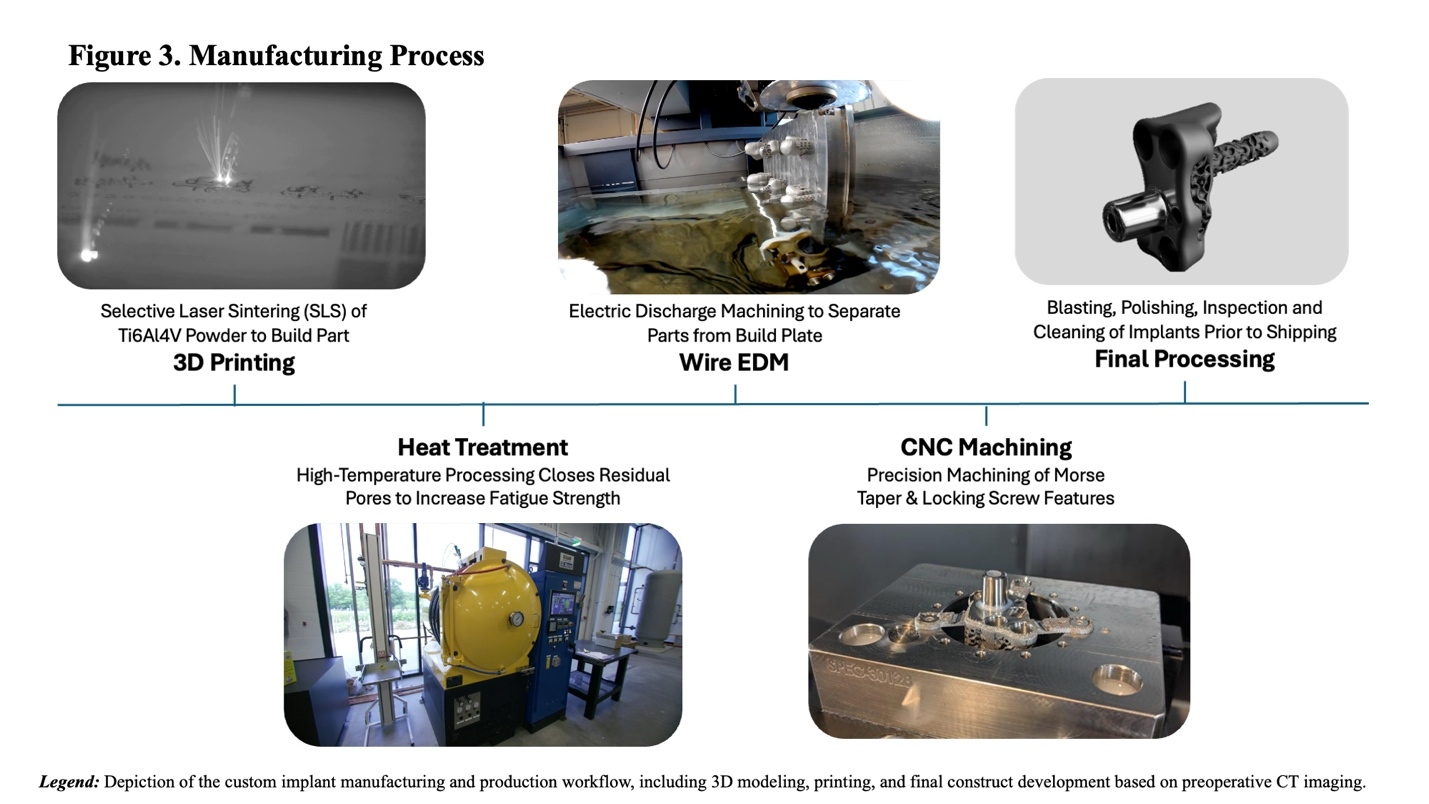
Following heat treatment, the baseplate is detached from the build plate using electric discharge machining (EDM), a thermoelectric technique that erodes material through carefully controlled, high-energy sparks. EDM allows for a clean separation of the implant without damaging its intricate geometries or compromising internal structures. After EDM, the implant undergoes CNC (computer numerical control) machining to create high tolerance features necessary for implant assembly and fixation. This includes the Morse taper, a conical interface critical for attaching the glenosphere to the baseplate. Achieving the correct taper angle and surface finish is crucial for mechanical stability, and this level of precision cannot be obtained through 3d-printing alone.
CNC machining also creates threaded holes for locking screws. Locking screws play a vital role in stabilizing the baseplate, especially during initial healing when micromovement must be minimized to promote osseointegration. By machining each hole to exact specifications, the screws securely anchor the baseplate to the bone, providing both immediate stability and long-term support (Roche et al. 2019).
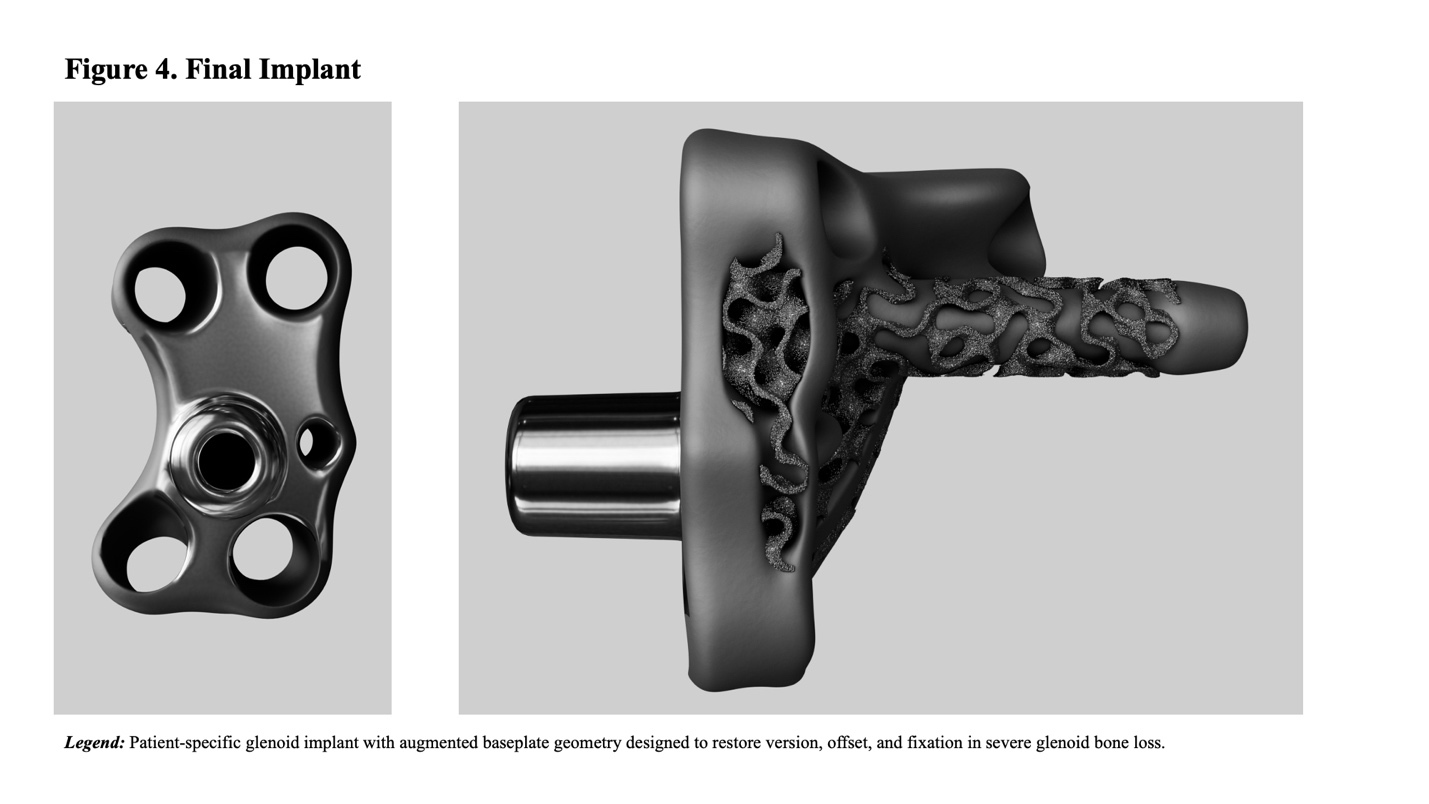
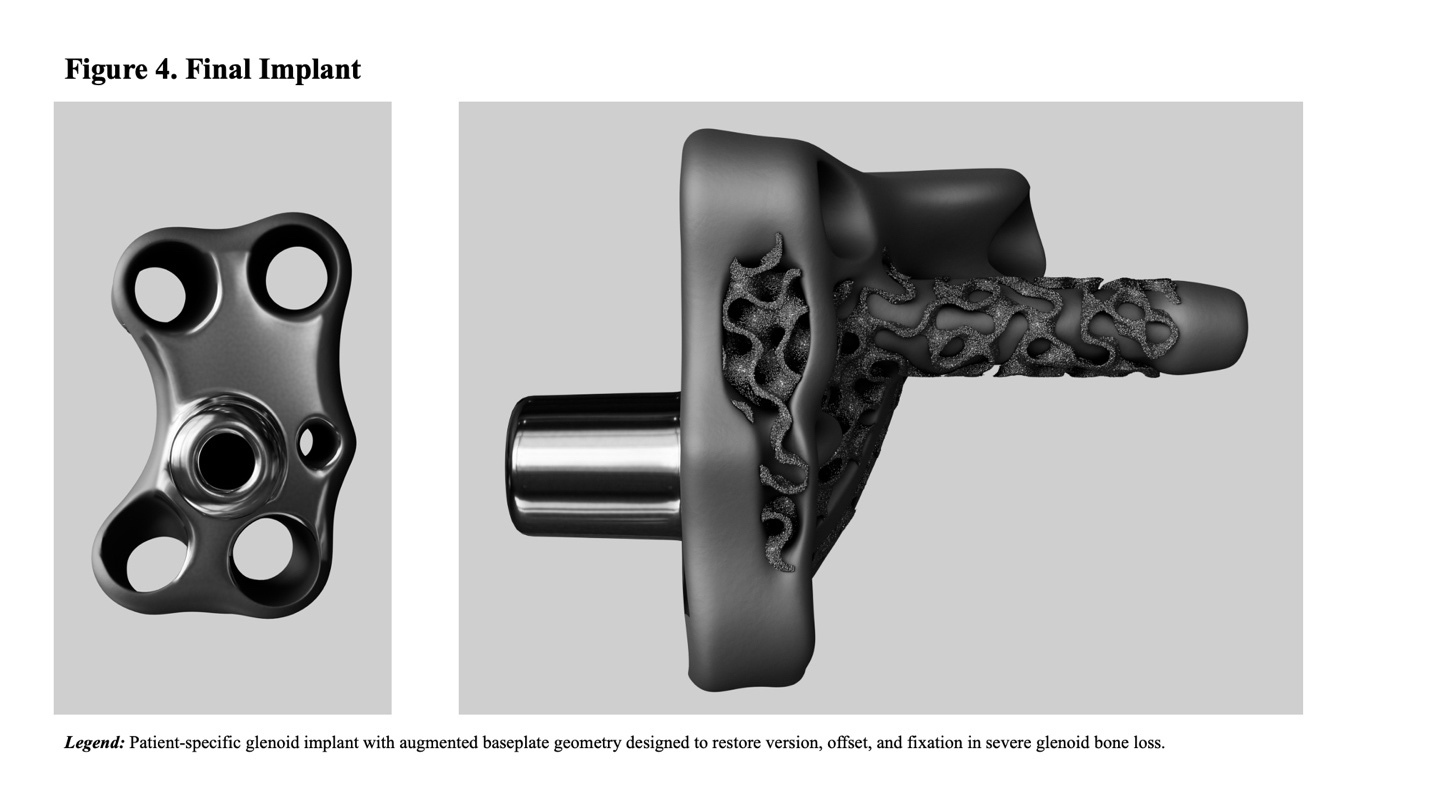
Surface treatments are then applied to enhance the implant’s longevity and functionality, optimizing the interface between implant and surrounding bone. Physical methods such as micro-blasting, high-pressure particles that remove surface imperfections, are employed to refine surface roughness and remove any residual powder or irregularities. In contrast, polishing techniques are used to smooth critical surfaces and improve compatibility with patient anatomy. Together, these finishing steps help ensure the implant performs reliably in the body (Figure 4).
Inspection and Cleaning
After post-processing, each implant undergoes a rigorous inspection to verify that critical dimensions meet design specifications. Standardized cleaning protocol is performed before the implants are packaged and shipped to remove any residual debris or contaminants from the manufacturing process. These devices can be delivered sterile or non-sterile. If sent non-sterile, the sterilization is performed at the hospital prior to surgery. Typically, the entire process takes 4-6 weeks.
Intra-Operative Surgical Technique and Implantation
During surgery, the patient was positioned in a semi-beach chair position and a standard deltopectoral approach was employed. Intraoperatively, the glenoid was found to have healed with malunion following a prior fracture, with residual bone loss still evident. The humeral head was resected using a neck cut guide for accurate alignment, and sequential sounders and compactors were used to prepare the humeral canal for a size 3 stem, ensuring a stable fit. Calcar reaming was performed to optimize the proximal bone surface and improve contact for the implant. The glenoid exposure was obtained with careful release of capsule and soft tissues. Glenoid retractors placed for adequate exposure then custom instrumentation utilized to prepare the glenoid. The patient-specific guide was used to place a central guidewire and optimize positioning of the custom glenoid component. The post was then drilled using the guides and then the custom baseplate was inserted and secured with through the central post. A threaded drill tower was used to guide the four peripheral fixed-angle locking screws based on the planned trajectories. Lengths implanted were (30 mm x 1.8 mm and 1.2 mm). Once implanted, stability and full seating were verified. There was excellent stability of the baseplate. The remainder of the case was then completed in a standard fashion with glenosphere implantation and then humeral component placement. Once complete construct verified stability and soft tissue tensioning verified to be excellent.
Post-operative Course
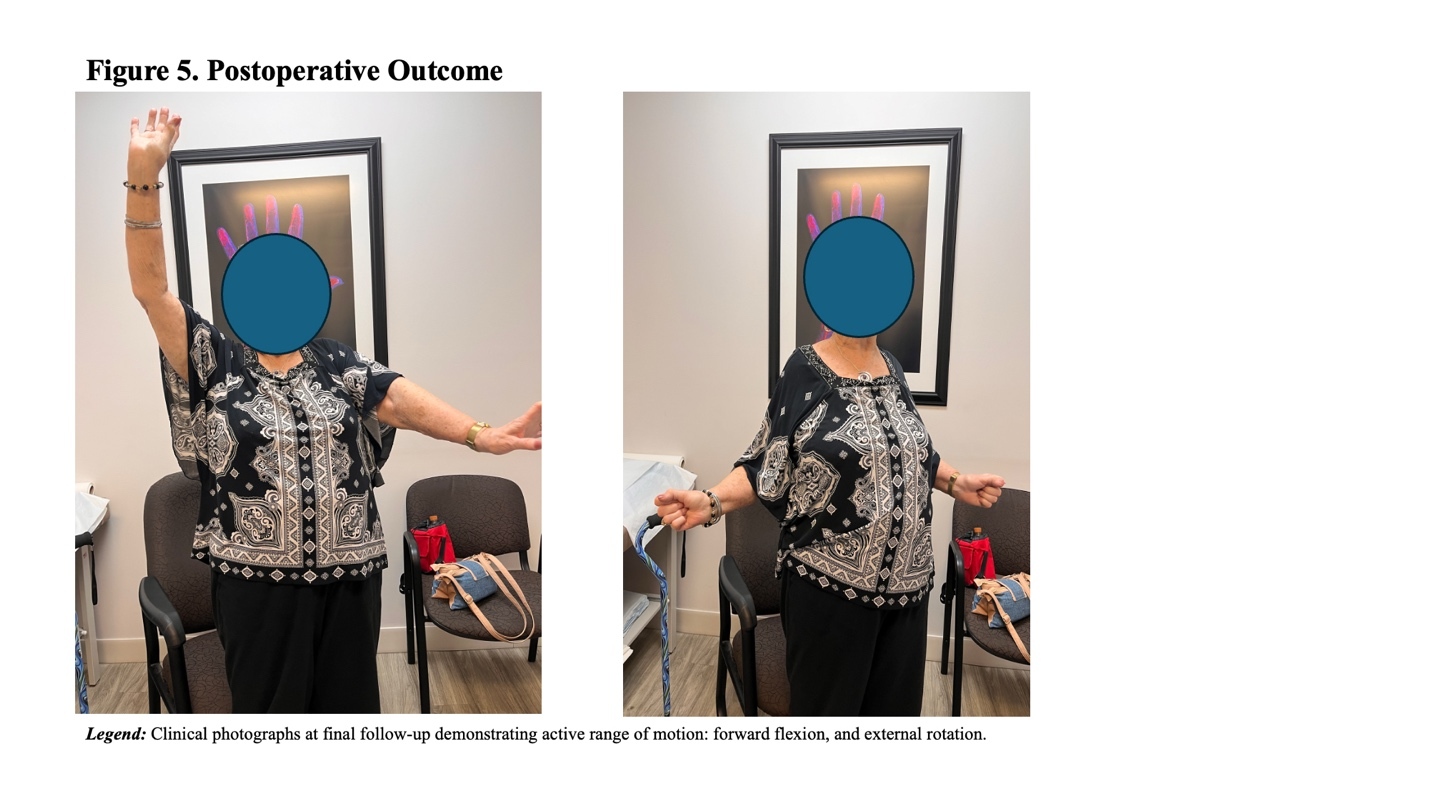
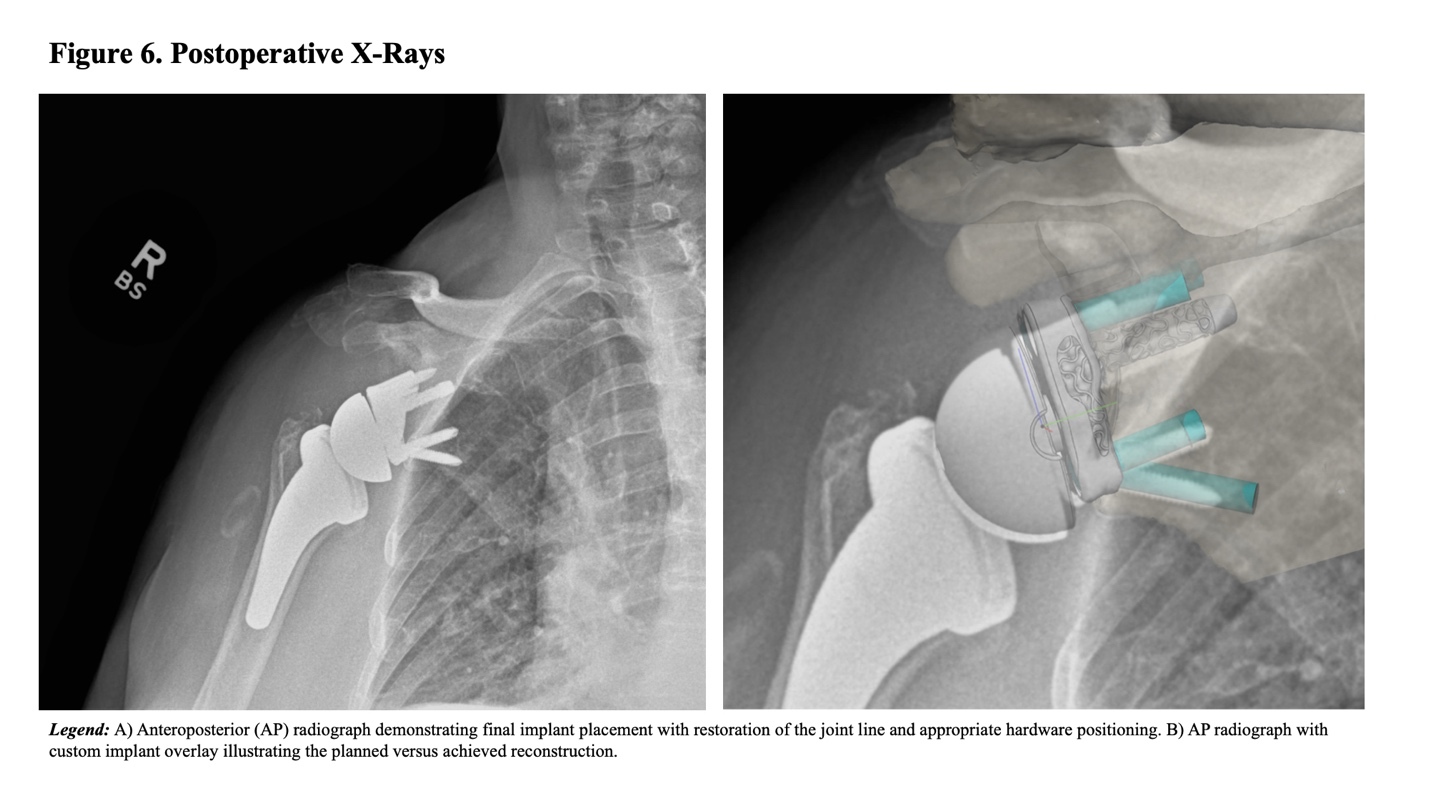
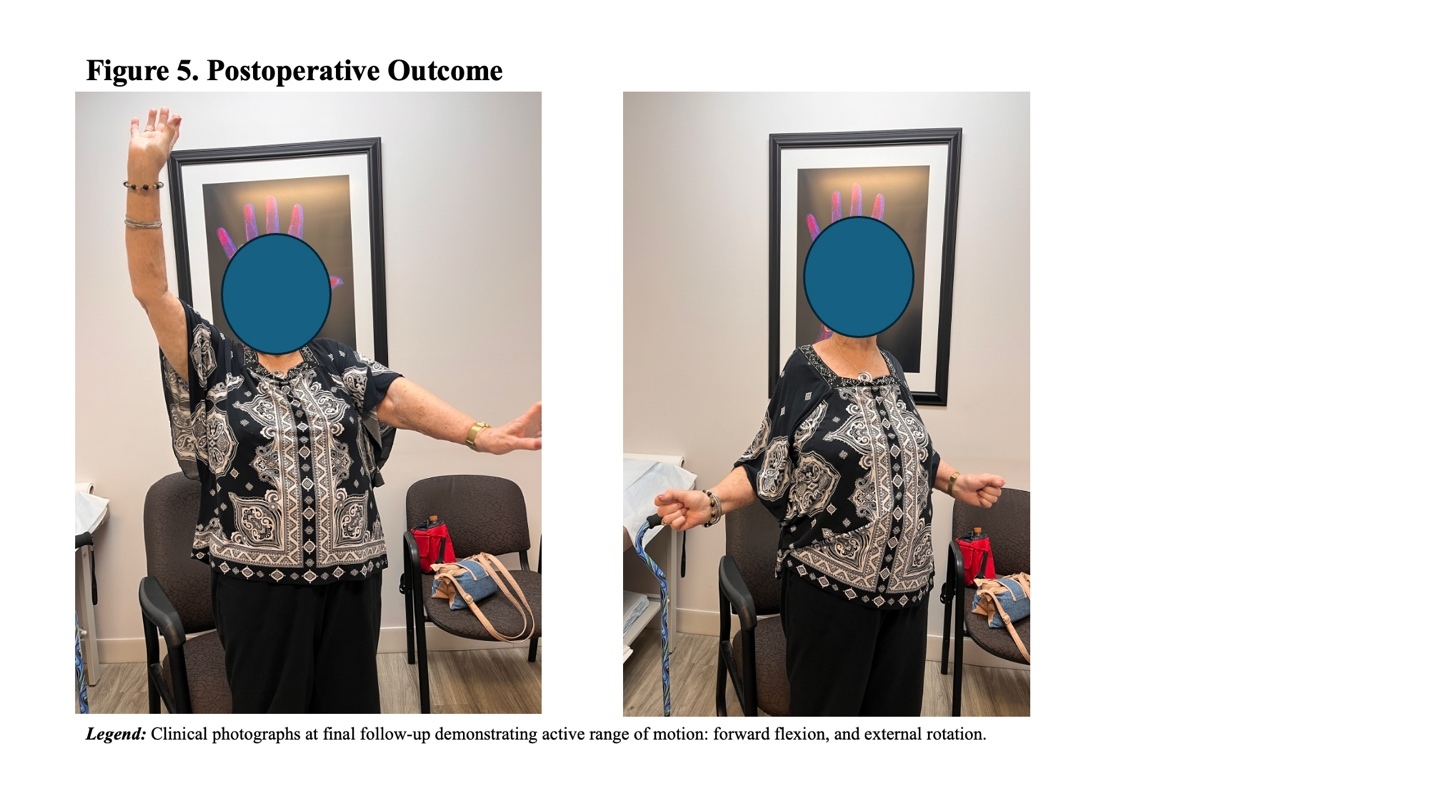
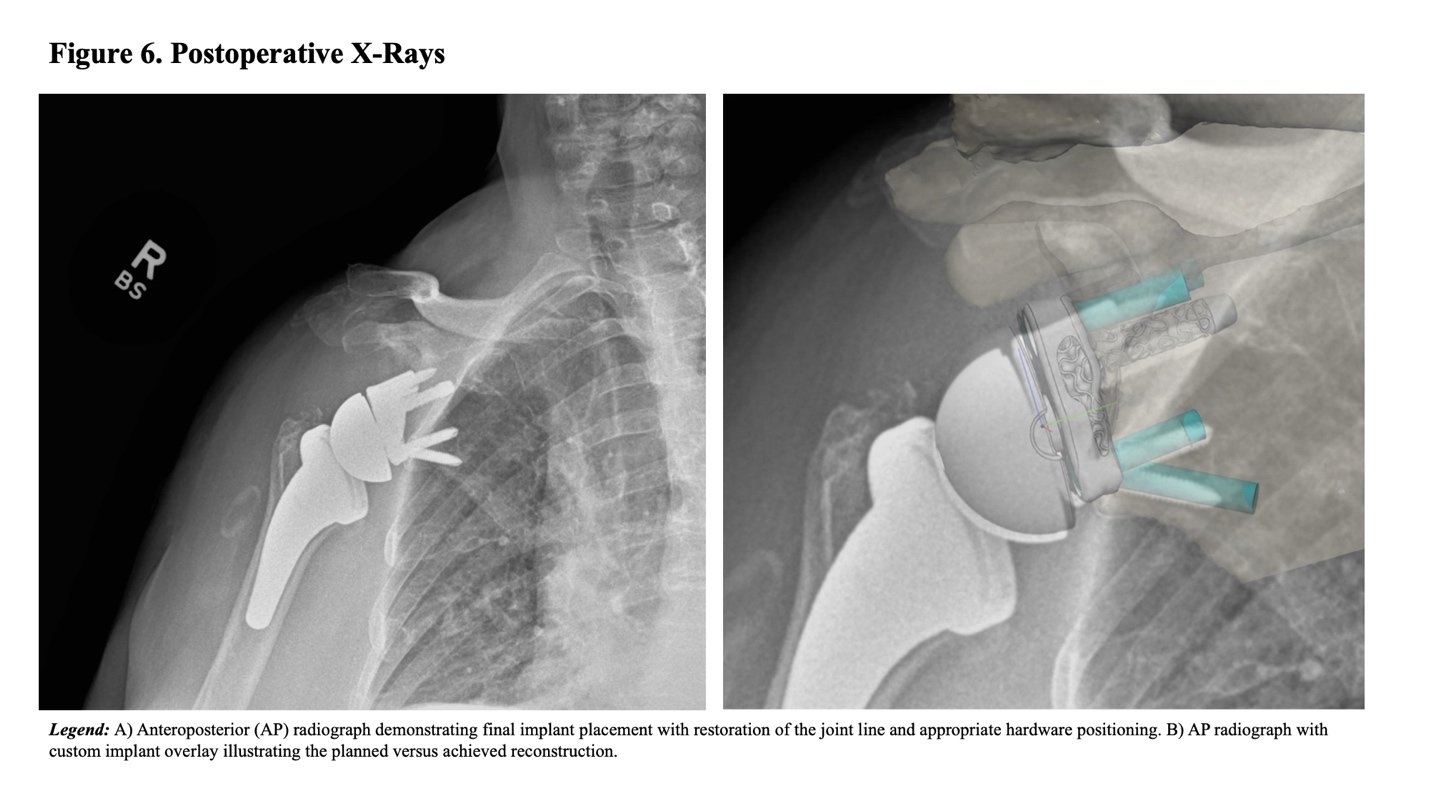
Postoperative rehab and recovery was performed in standard fashion with initial home health PT and progressive range of motion beginning at 2 weeks postoperative the patient had improved forward elevation to 160 degrees of forward flexion and abduction, 40 degrees of external rotation, and internal rotation to lower lumbar spine. At six months postoperative, the patient achieved 170 degrees of forward elevation, 160 degrees of abduction, and external rotation of 60 degrees, with full strength in forward flexion, external rotation, and internal rotation (Figure 5). Post-operative x-rays demonstrate the baseplate to be well-seated and achieved restoration of joint line and fixation as designed in preoperative plan (Figure 6). Despite her chronic pain history and ongoing use of oxycodone, she reported overall satisfaction with her recovery. She has been attending physical therapy which has significantly improved her strength and range of motion for her right shoulder and she demonstrates better function than her left shoulder with the history of periprosthetic fracture.
Cost and Accessibility
Custom implants in reverse shoulder arthroplasty are often perceived as costly, time-consuming, and logistically complex, which has limited their widespread adoption. As illustrated in this case, the development of a customized glenoid component involves a rigorous design work and personalized manufacturing that takes 4-6 weeks. The associated financial burden and lack of insurance reimbursement for these complex implants is a key factor restricting use to cases where off-the-shelf solutions are not suitable. For example, a standard off-the-shelf baseplate has a list price can be anywhere from $4000- 10,000, while a customized baseplate is listed at $10,000-15,000 USD (Haikal et al. 2023). However, as automation and manufacturing technologies continue to reduce both time and costs, the cost of customized prostheses will likely decline, potentially expanding their clinical indications.
Conclusion
Custom glenoid implants are a powerful tool for addressing the anatomic complexity and fixation challenges of severe glenoid deformity in RSA. This case illustrates the impact of customized design in translating a severely deformed glenoid into a well-fixed and functional joint for restored mobility and improved quality of life. In cases like this one, customization resolves situations where traditional approaches fall short and supports the expanding role of custom RSA technology in modern practice. As the technology becomes more accessible and the clinical benefits more evident, custom implants are poised to take a central role in the landscape of shoulder arthroplasty.